Editor’s Note: “Hi, I’m Kiran! As a professional Nutritionist, I’ve updated this guide for 2026 to ensure you have the most accurate timings and fail-proof techniques for perfect eggs every time. My goal is to combine expert nutritional advice with practical kitchen hacks to help you reach your wellness goals. Enjoy the perfect peel!”
Boiling an egg is often the very first thing we learn in the kitchen, yet it remains one of the most debated topics. This guide provides a scientific approach to achieving the perfect egg every time.
The 2026 Method: Stovetop vs. Air Fryer
Traditional boiling is great, but did you know that steaming or air-frying often leads to easier peeling?
The Timing Chart (Precision Matters)
| Method | Soft Boiled (Runny) | Medium (Jammy) | Hard Boiled (Set) |
| Stovetop | 6 Minutes | 7-8 Minutes | 10-12 Minutes |
| Air Fryer (250°F) | 9 Minutes | 12 Minutes | 15 Minutes |
1. Quick Summary: The Essential Checklist
Before you start, ensure you have these basics ready:
- Eggs: Preferably 7–10 days old for easier peeling.
- Water: Enough to cover eggs by at least 1 inch.
- Pot: A heavy-bottomed saucepan for even heat.
- Timer: Essential for precision.
- Ice Bath: A bowl with 50% ice and 50% water.
2. The Definitive Egg Timing Chart
Use this table to choose your desired yolk consistency. These timings are based on the “Hot Start” method (dropping eggs into boiling water).
| Boiling Time | Yolk Description | Best For… |
| 6 Minutes | Liquid gold, very runny | Dipping toast soldiers |
| 7 Minutes | “Jammy” and custardy | Ramen bowls & Avocado toast |
| 8 Minutes | Soft-set but creamy gold | Protein-packed salads |
| 10 Minutes | Fully set, bright yellow | Standard breakfast/Snacks |
| 12 Minutes | Firm and light yellow | Deviled eggs & Egg salad |
| 14+ Minutes | Very hard and dry | Grating over dishes |
3. Comparing Methods: Cold Start vs. Hot Start
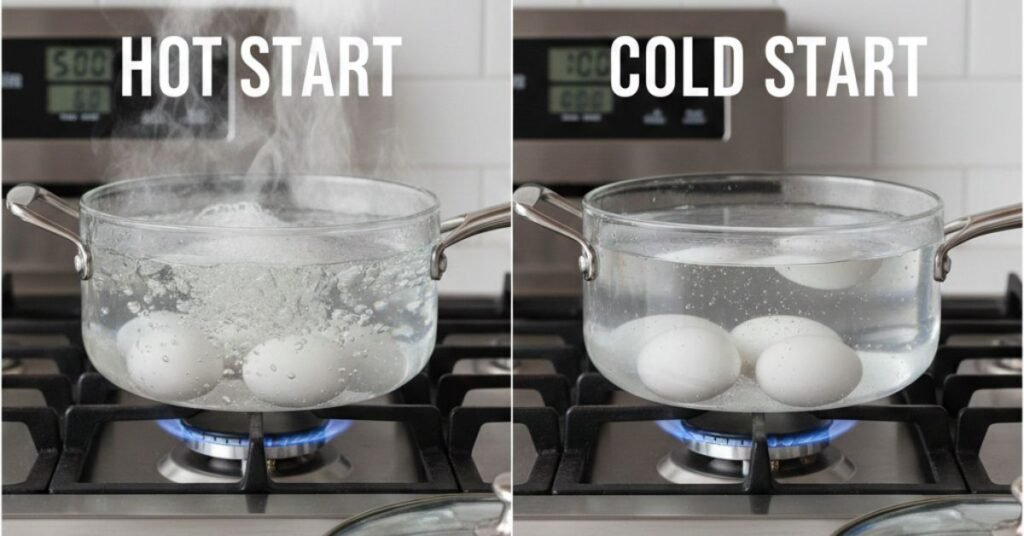
Which method should you use? Here is a quick comparison:
Cold Start Method
- How: Eggs and water start cold together.
- Best for: Preventing cracks in thin-shelled eggs.
- Drawback: Harder to time; shells often stick to the white.
Hot Start Method (Recommended)
- How: Eggs are lowered into already boiling water.
- Best for: Easy peeling and precise timing.
- Drawback: Eggs may crack if dropped too quickly.
Step-by-Step: The “Hot Start” Secret
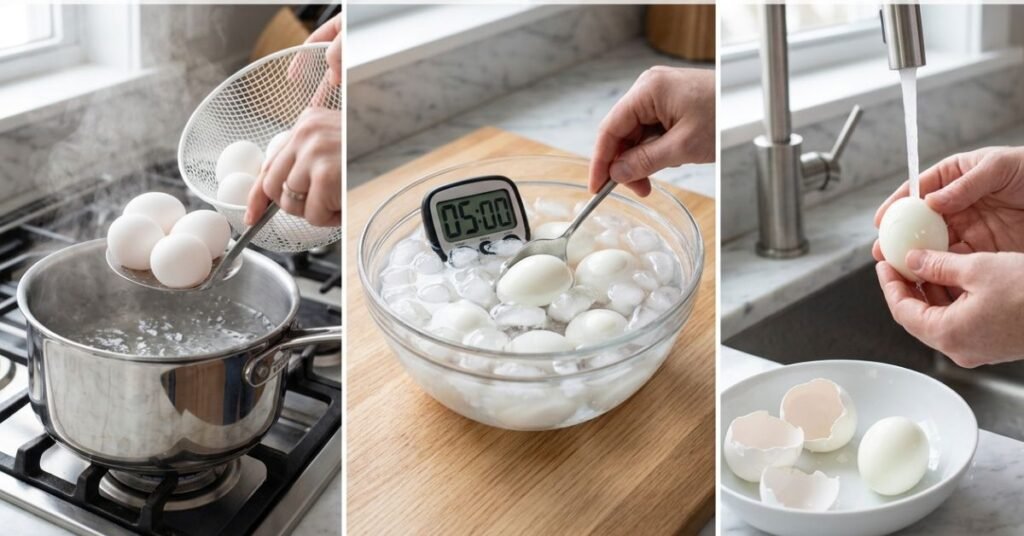
For the easiest peel, always start with boiling water. This “shocks” the membrane, preventing it from sticking to the shell.
- Boil: Bring water to a rolling boil.
- Lower: Gently drop eggs using a slotted spoon.
- Simmer: Maintain a gentle bubble (not a violent boil).
- Shock: Move immediately to an ice bath for 10 minutes.
4. Step-by-Step Instructions
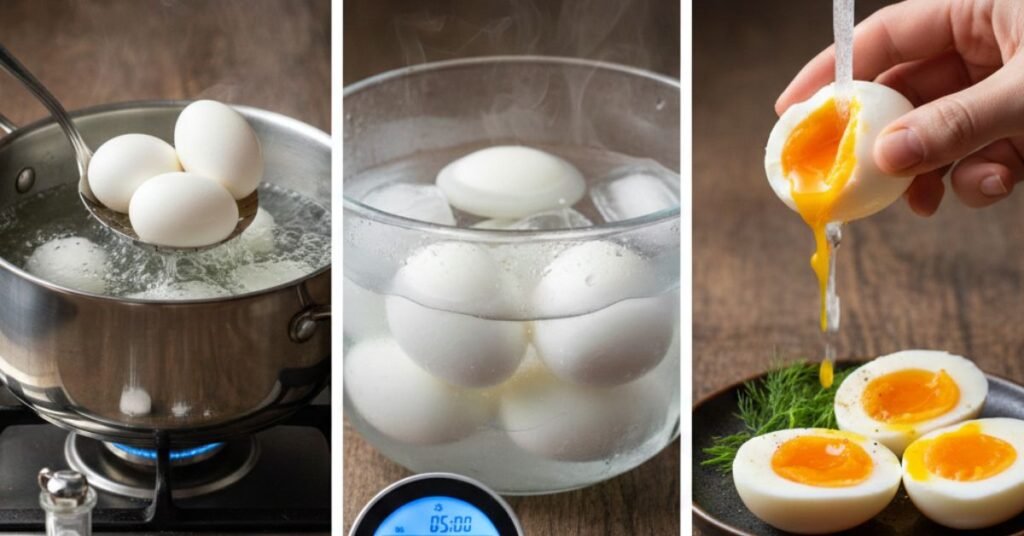
Follow these bulleted steps for a flawless result:
- Boil the Water: Fill your pot and bring it to a rolling boil.
- Lower the Heat: Turn it down to a simmer so the eggs don’t bounce and break.
- Add Eggs: Use a slotted spoon to gently place eggs in the pot.
- Set the Timer: Turn the heat back up and start your timer immediately.
- Prepare Ice Bath: While boiling, set up your bowl of ice and water.
- Shock the Eggs: Once the timer dings, move eggs to the ice bath for 10 minutes.
Nutrition Facts & Health Benefits
Eggs are a powerhouse of high-quality protein and essential vitamins.
| Nutrient | Amount per Large Egg |
| Calories | 72 kcal |
| Protein | 6.3 g |
| Healthy Fats | 4.8 g |
| Vitamin D | 6% DV |
5. Pro-Tips for “Easy-Peel” Success
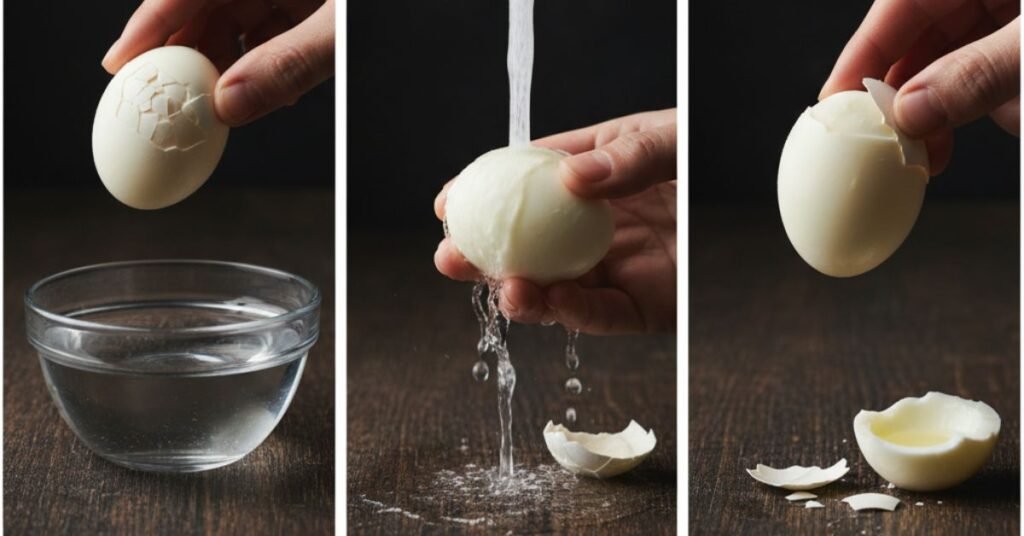
If you struggle with shells sticking to the whites, try these expert hacks:
- The Tap and Roll: Gently tap the egg on a hard surface and roll it under your palm to create dozens of tiny cracks.
- The Water Flow: Peel the egg under cold running tap water; the pressure helps lift the membrane.
- The Bottom-First Rule: Always start peeling from the wider end of the egg (where the air pocket is).
- Vinegar Hack: Add 1 tbsp of white vinegar to the boiling water to help the whites set faster if a crack occurs.
6. Troubleshooting Common Mistakes
Are your eggs not coming out right? Check these common issues:
- Greenish Yolk? You overcooked it. Reduce timing by 1–2 minutes.
- Egg Phat Gaya (Cracked)? Use room-temperature eggs instead of cold fridge eggs to avoid thermal shock.
- Rubbery Whites? The water was boiling too violently. Use a gentle simmer instead.
7.Conclusion
Mastering the boiled egg is about Control. By using a timer and an ice bath, you take the guesswork out of the process. Whether you want a “Jammy” Ramen egg or a firm egg for your salad, these steps ensure success every single time.
8. Frequently Asked Questions (FAQs)
- Can I boil eggs in an Air Fryer? Yes! 250°F (120°C) for 15 minutes usually yields a hard-boiled egg.
- How long do they stay fresh? * In Shell: 7 days in the fridge.
- Peeled: 2 days in a sealed container.
- Why do some eggs float? If an egg floats in raw water, it’s old and has too much air inside. It’s best to discard it.
Author Note: “Hi, I’m Kiran! As a professional Nutritionist and the creator of Prepslim.com, I specialize in high-protein, keto-friendly meal planning. I’ve updated this guide for 2026 to bring you the most accurate, fail-proof methods for perfect eggs, helping you simplify your healthy lifestyle. Let’s make meal prep effortless together!”